CyberGus

Well-known member
First Name
Gus
Joined
May 22, 2021
Threads
89
Messages
9,632
Reaction score
31,620
Location
Austin, TX
Vehicles
1981 DeLorean, 2024 Cybertruck
Occupation
IT Specialist
Country flag
I cleaned under the Glare Shield today, mostly following the Tesla procedure, not too tough. The first step is to remove the rearview mirror, which most of you have done already lol. I previously bought a set of Torx bits, you need a T20.

Then it's just a matter of gently prying away the Beauty Cover from the 4 clips. I used my trim-removal tools from Amazon and didn't break anything. (UPDATE: later revisions of the Overhead Gear Selector include a pin into the Beauty Cover that my '24 CT lacks, thus necessitating its removal first.)

Tesla Cybertruck How-to Clean Forward Camera View / Glare Shield (fix "camera visibility limited" issue) - DIY IMG_0485


I also opted to skip cable disconnection and let the parts dangle. That's not great for the cables, but unplugging and reconnecting has its own risks as well. The trick was to avoid banging into the dangly bits while cleaning. (UPDATE: When I replaced the Glare Shield after my 2nd cleaning attempt, I spent a good 30 minutes trying to separate the GPS antenna from the connector, and gave up when I was was sure it would break if I tried any harder.)

After the Beauty Cover, the Glare Shield is easy, with one unlocking tab on each side. Again I opted to leave the cable connected. (UPDATE: the Glare Shield plastic is very stiff and brittle, handle the tabs gently or they will break! Only $30 to replace.)

Then the fun begins. I tried IPA but that just smeared everything around. Next was quality glass cleaner and a Magic Eraser, followed by microfiber wipedown. I repeatedly exited to check the progress from outside, where the sun was clearly highlighting any inadequacies.

I cleaned the lenses with photographer's lens paper and lens cleaner. (There are three "lenses" but the one closest to the passenger is just a blank plastic insert.) I used a compressed-gas duster to clear the area of dust and residue.

After verifying it looked good in the Camera Preview, I buttoned it back up. The only tricky part was the Glare Shield, since it has little tabs at the top that must line up with the corresponding hooks on the camera housing. Be very careful with the tabs when reinstalling!

Hopefully I won't need to repeat this procedure too often, but I did notice the little PC-type cooling fan on the camera housing. The required airflow will result in the area under the shield being constantly exposed to contaminants.

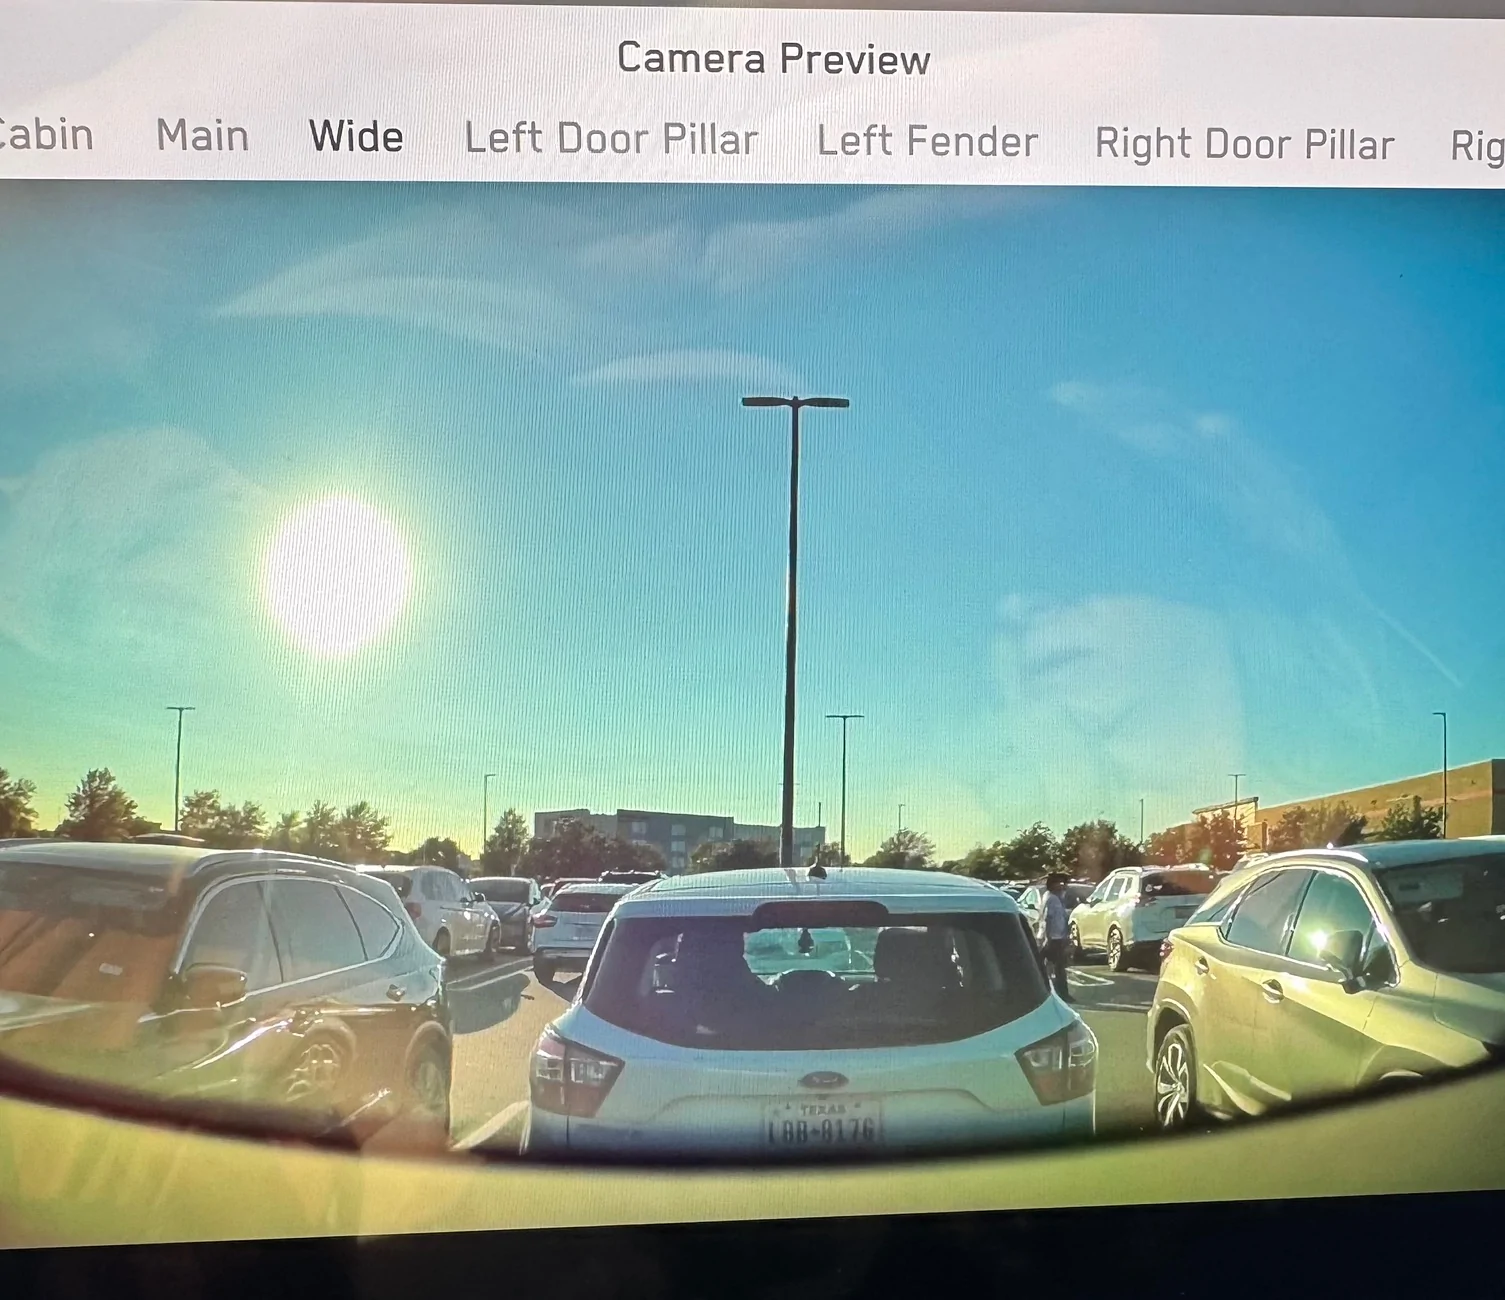
UPDATE: this the camera preview after cleaning, while pointing directly into the sun.

Tesla Cybertruck How-to Clean Forward Camera View / Glare Shield (fix "camera visibility limited" issue) - DIY IMG_0485


The glare visible on the image is due to the reflection off the screen, the image itself is perfect. I never get the "red hands of death" nor phantom wipes when the view is this clean.
Sponsored

 
Last edited:

wh1t3rbb1t

Well-known member
Joined
Jan 3, 2024
Threads
10
Messages
170
Reaction score
291
Location
San Diego
Vehicles
Cybertruck Founders Edition
Occupation
Cybersecurity
Country flag
I cleaned under the Glare Shield today, mostly following the Tesla procedure, not too tough. The first step is to remove the rearview mirror, which most of you have done already lol. I previously bought a set of Torx bits, you need a T20.

Then it's just a matter of gently prying away the Beauty Cover from the 4 clips. I used my trim-removal tools from Amazon and didn't break anything.

Tesla Cybertruck How-to Clean Forward Camera View / Glare Shield (fix "camera visibility limited" issue) - DIY {filename}


I also opted to skip cable disconnection and let the parts dangle. That's not great for the cables, but unplugging and reconnecting has its own risks as well. The trick was to avoid banging into the dangly bits while cleaning.

After the Beauty Cover, the Glare Shield is easy, with one unlocking tab on each side. Again I opted to leave the cable connected.

Then the fun begins. I tried IPA but that just smeared everything around. Next was quality glass cleaner and a Magic Eraser, followed by microfiber wipedown. I repeatedly exited to check the progress from outside, where the sun was clearly highlighting any inadequacies.

I cleaned the lenses with photographer's lens paper and lens cleaner. I used a compressed-gas duster to clear the area of dust and residue.

After verifying it looked good in the Camera Preview, I buttoned it back up. The only tricky part was the Glare Shield, since it has little tabs at the top that must line up with the corresponding hooks on the camera housing.

Hopefully I won't need to repeat this procedure too often, but I did notice the little PC-type cooling fan on the camera housing. The required airflow will result in the area under the shield being constantly exposed to contaminants. Good thing I quit smoking!
Great write up. Thanks!
 

BeFamousVideo

Well-known member
First Name
Vincent
Joined
Feb 16, 2024
Threads
5
Messages
551
Reaction score
605
Location
Orange County, CA
Vehicles
CT Beast delivered May 2024
Occupation
Automation Agency
Country flag
I cleaned under the Glare Shield today, mostly following the Tesla procedure, not too tough. The first step is to remove the rearview mirror, which most of you have done already lol. I previously bought a set of Torx bits, you need a T20.

Then it's just a matter of gently prying away the Beauty Cover from the 4 clips. I used my trim-removal tools from Amazon and didn't break anything.

Tesla Cybertruck How-to Clean Forward Camera View / Glare Shield (fix "camera visibility limited" issue) - DIY {filename}


I also opted to skip cable disconnection and let the parts dangle. That's not great for the cables, but unplugging and reconnecting has its own risks as well. The trick was to avoid banging into the dangly bits while cleaning.

After the Beauty Cover, the Glare Shield is easy, with one unlocking tab on each side. Again I opted to leave the cable connected.

Then the fun begins. I tried IPA but that just smeared everything around. Next was quality glass cleaner and a Magic Eraser, followed by microfiber wipedown. I repeatedly exited to check the progress from outside, where the sun was clearly highlighting any inadequacies.

I cleaned the lenses with photographer's lens paper and lens cleaner. I used a compressed-gas duster to clear the area of dust and residue.

After verifying it looked good in the Camera Preview, I buttoned it back up. The only tricky part was the Glare Shield, since it has little tabs at the top that must line up with the corresponding hooks on the camera housing.

Hopefully I won't need to repeat this procedure too often, but I did notice the little PC-type cooling fan on the camera housing. The required airflow will result in the area under the shield being constantly exposed to contaminants. Good thing I quit smoking!
Valuable post. Thanks.
I've had Tesla clean the glare shield twice.
1st time I asked the mobile rep what chemical he was using. He said 90% alcohol. But his rag maybe was compromised, it left a film enough to piss off my wipers.
And now I know this will be a recurring cleaning task due to air contaminates.
 

cyber61

Active member
First Name
Bruce
Joined
Apr 5, 2024
Threads
5
Messages
31
Reaction score
30
Location
Port Angeles, WA
Vehicles
Cybertruck order, previous Model 3
Country flag
I cleaned under the Glare Shield today, mostly following the Tesla procedure, not too tough. The first step is to remove the rearview mirror, which most of you have done already lol. I previously bought a set of Torx bits, you need a T20.

Then it's just a matter of gently prying away the Beauty Cover from the 4 clips. I used my trim-removal tools from Amazon and didn't break anything.

Tesla Cybertruck How-to Clean Forward Camera View / Glare Shield (fix "camera visibility limited" issue) - DIY {filename}


I also opted to skip cable disconnection and let the parts dangle. That's not great for the cables, but unplugging and reconnecting has its own risks as well. The trick was to avoid banging into the dangly bits while cleaning.

After the Beauty Cover, the Glare Shield is easy, with one unlocking tab on each side. Again I opted to leave the cable connected.

Then the fun begins. I tried IPA but that just smeared everything around. Next was quality glass cleaner and a Magic Eraser, followed by microfiber wipedown. I repeatedly exited to check the progress from outside, where the sun was clearly highlighting any inadequacies.

I cleaned the lenses with photographer's lens paper and lens cleaner. I used a compressed-gas duster to clear the area of dust and residue.

After verifying it looked good in the Camera Preview, I buttoned it back up. The only tricky part was the Glare Shield, since it has little tabs at the top that must line up with the corresponding hooks on the camera housing.

Hopefully I won't need to repeat this procedure too often, but I did notice the little PC-type cooling fan on the camera housing. The required airflow will result in the area under the shield being constantly exposed to contaminants. Good thing I quit smoking!
What exactly am I cleaning here? This wiper issue seems to happen randomly. FYI, I recently installed the Hansshow rearview mirror/camera (love it) and don’t want to mess with it. Also, this issue has been going on since I bought the truck last November.
 
OP
OP
CyberGus

CyberGus

Well-known member
First Name
Gus
Joined
May 22, 2021
Threads
89
Messages
9,632
Reaction score
31,620
Location
Austin, TX
Vehicles
1981 DeLorean, 2024 Cybertruck
Occupation
IT Specialist
Country flag
What exactly am I cleaning here?
Contaminants accumulate on the inner windshield glass, in front of the forward cameras. The resulting haze causes the camera to believe the windshield is dirty.

In direct sun, the clarity (or haziness) of that triangular area should be quite evident.


cyber61

Active member
First Name
Bruce
Joined
Apr 5, 2024
Threads
5
Messages
31
Reaction score
30
Location
Port Angeles, WA
Vehicles
Cybertruck order, previous Model 3
Country flag
Contaminants accumulate on the inner windshield glass, in front of the forward cameras. The resulting haze causes the camera to believe the windshield is dirty.

In direct sun, the clarity (or haziness) of that triangular area should be quite evident.
Thanks for clarifying this; no pun intended. I’ll see if cleaning takes care of it.
 

hemiarch

Well-known member
First Name
Ace
Joined
Jan 22, 2025
Threads
102
Messages
7,557
Reaction score
8,658
Location
Arizona
Vehicles
2024 foundation AWD, 2024 model x
Occupation
Trauma Surgeon
Country flag
Cleaning the grimy windshield under the camera shield is my weekend project. The preview image is very hazy and FSD has similarly complained when driving sunward.
Good for you. I took it to Tesla and asked them to do it for me. It was dumb, I know, but there is a whole service procedure for it so I figured I better let the “experts” handle it.
Anyway, those monkeys broke the climate keeper sensor putting the mirror housing cover back on. I had to drive around with very quirky non-working AC in the Phoenix summer until they ordered the part and sent mobile to come replace it which took about a week.
To add insult to injury, they jacked up one of the clips and never actually replaced the camera housing so now I periodically have to push it back into place and cuss.

Tesla Cybertruck How-to Clean Forward Camera View / Glare Shield (fix "camera visibility limited" issue) - DIY IMG_8240
 
OP
OP
CyberGus

CyberGus

Well-known member
First Name
Gus
Joined
May 22, 2021
Threads
89
Messages
9,632
Reaction score
31,620
Location
Austin, TX
Vehicles
1981 DeLorean, 2024 Cybertruck
Occupation
IT Specialist
Country flag
Good for you. I took it to Tesla and asked them to do it for me. It was dumb, I know, but there is a whole service procedure for it so I figured I better let the “experts” handle it.
Anyway, those monkeys broke the climate keeper sensor putting the mirror housing cover back on. I had to drive around with very quirky non-working AC in the Phoenix summer until they ordered the part and sent mobile to come replace it which took about a week.
To add insult to injury, they jacked up one of the clips and never actually replaced the camera housing so now I periodically have to push it back into place and cuss.

Tesla Cybertruck How-to Clean Forward Camera View / Glare Shield (fix "camera visibility limited" issue) - DIY {filename}
Hardly anyone performs work to my satisfaction, but that's because I'm an asshole.

The "Tesla Service Experience" is the inevitable result of having little risk for shoddy work while rewarding efficiency. Mistakes are forgiven, delays are not.


PhilEsq

Well-known member
First Name
Philip
Joined
Aug 14, 2021
Threads
3
Messages
243
Reaction score
174
Location
Roslyn, NY
Vehicles
Cybertruck ordered and two MB GLC
Occupation
Attorney
Country flag
Mine became so cloudy that I keep getting notices from FSD to clean the windshield. A front of mine with a Model S said his wipers started working frequently Without Rain so he cleaned the outside with Sprayway which did not work and then used Invisible Glass which did work. I think I will bring my Cybertruck to service to have them clean in front of the camera.
 

cybersky

Active member
First Name
M
Joined
Jun 14, 2025
Threads
0
Messages
34
Reaction score
16
Location
Massachusetts
Vehicles
Cybertruck All-Wheel Drive
Country flag
I cleaned under the Glare Shield today, mostly following the Tesla procedure, not too tough. The first step is to remove the rearview mirror, which most of you have done already lol. I previously bought a set of Torx bits, you need a T20.

Then it's just a matter of gently prying away the Beauty Cover from the 4 clips. I used my trim-removal tools from Amazon and didn't break anything.

Tesla Cybertruck How-to Clean Forward Camera View / Glare Shield (fix "camera visibility limited" issue) - DIY {filename}


I also opted to skip cable disconnection and let the parts dangle. That's not great for the cables, but unplugging and reconnecting has its own risks as well. The trick was to avoid banging into the dangly bits while cleaning. (UPDATE: When I replaced the Glare Shield after my 2nd cleaning attempt, I spent a good 30 minutes trying to separate the GPS antenna from the connector, and gave up when I was was sure it would break if I tried any harder.)

After the Beauty Cover, the Glare Shield is easy, with one unlocking tab on each side. Again I opted to leave the cable connected. (UPDATE: the Glare Shield plastic is very stiff and brittle, handle the tabs gently or they will break!)

Then the fun begins. I tried IPA but that just smeared everything around. Next was quality glass cleaner and a Magic Eraser, followed by microfiber wipedown. I repeatedly exited to check the progress from outside, where the sun was clearly highlighting any inadequacies.

I cleaned the lenses with photographer's lens paper and lens cleaner. (There are three "lenses" but the one closest to the passenger is just a blank plastic insert.) I used a compressed-gas duster to clear the area of dust and residue.

After verifying it looked good in the Camera Preview, I buttoned it back up. The only tricky part was the Glare Shield, since it has little tabs at the top that must line up with the corresponding hooks on the camera housing. Be very careful with the tabs when reinstalling!

Hopefully I won't need to repeat this procedure too often, but I did notice the little PC-type cooling fan on the camera housing. The required airflow will result in the area under the shield being constantly exposed to contaminants. Good thing I quit smoking!
Thank you for posting this. Hard to find any information except for service manual where everything is so "easy" .

I cleaned mine as well. I had to disconnect upper console though as it has a pin through the beauty cover. It required some serious effort to the point I was thinking I would break something. The rest was easy with the warnings you posted. I also couldn't easily disconnect those electrical clips. There must be a tool to do it...

Tesla Cybertruck How-to Clean Forward Camera View / Glare Shield (fix "camera visibility limited" issue) - DIY 20251019_165208(1)
 

mongo

Well-known member
Joined
May 27, 2024
Threads
3
Messages
4,046
Reaction score
4,803
Location
SE Michigan
Vehicles
Cyberbeast
Country flag
Thank you for posting this. Hard to find any information except for service manual where everything is so "easy" .

I cleaned mine as well. I had to disconnect upper console though as it has a pin through the beauty cover. It required some serious effort to the point I was thinking I would break something. The rest was easy with the warnings you posted. I also couldn't easily disconnect those electrical clips. There must be a tool to do it...

Tesla Cybertruck How-to Clean Forward Camera View / Glare Shield (fix "camera visibility limited" issue) - DIY {filename}
Disconnecting the electrical connectors isn't required. I clean around the dangling modules.
 

CaseyL

Member
Joined
Dec 9, 2024
Threads
0
Messages
17
Reaction score
26
Location
Florida Panhandle
Vehicles
2021 Model Y LR, 2024 Cybertruck AWD
Occupation
Engineer
Country flag
I cleaned under the Glare Shield today, mostly following the Tesla procedure, not too tough. The first step is to remove the rearview mirror, which most of you have done already lol. I previously bought a set of Torx bits, you need a T20.

Then it's just a matter of gently prying away the Beauty Cover from the 4 clips. I used my trim-removal tools from Amazon and didn't break anything.

Tesla Cybertruck How-to Clean Forward Camera View / Glare Shield (fix "camera visibility limited" issue) - DIY {filename}


I also opted to skip cable disconnection and let the parts dangle. That's not great for the cables, but unplugging and reconnecting has its own risks as well. The trick was to avoid banging into the dangly bits while cleaning. (UPDATE: When I replaced the Glare Shield after my 2nd cleaning attempt, I spent a good 30 minutes trying to separate the GPS antenna from the connector, and gave up when I was was sure it would break if I tried any harder.)

After the Beauty Cover, the Glare Shield is easy, with one unlocking tab on each side. Again I opted to leave the cable connected. (UPDATE: the Glare Shield plastic is very stiff and brittle, handle the tabs gently or they will break!)

Then the fun begins. I tried IPA but that just smeared everything around. Next was quality glass cleaner and a Magic Eraser, followed by microfiber wipedown. I repeatedly exited to check the progress from outside, where the sun was clearly highlighting any inadequacies.

I cleaned the lenses with photographer's lens paper and lens cleaner. (There are three "lenses" but the one closest to the passenger is just a blank plastic insert.) I used a compressed-gas duster to clear the area of dust and residue.

After verifying it looked good in the Camera Preview, I buttoned it back up. The only tricky part was the Glare Shield, since it has little tabs at the top that must line up with the corresponding hooks on the camera housing. Be very careful with the tabs when reinstalling!

Hopefully I won't need to repeat this procedure too often, but I did notice the little PC-type cooling fan on the camera housing. The required airflow will result in the area under the shield being constantly exposed to contaminants. Good thing I quit smoking!
I was getting continual warnings about the camera being obscured, so I gave it a shot.

I was doing pretty good, but I still broke both tabs on the glare shield, in spite of the warning. After cleaning the glass, I managed to snap everything else together for the time being and it seems to hold together and the Service Preview looks normal.

I was trying to avoid a 120 mile round trip and taking a day off work.

I did order a new glare shield using the convenient link.


Top